💡 PassiveLab Summary – PC Storage Sharing
Loading…
Loading…
Loading…
Loading…
Loading…
Loading…
Loading…
Loading…
PC Storage Sharing via Storj
If you’ve got a PC running 24/7 and some spare storage, sharing it via Storj can be a simple way to earn passive income. If you’re going to give it a try, it’s also worth doing other tasks that require PC uptime, such as CPU Sharing or Bandwidth Sharing.
This guide walks you through the setup process based on my real-world experience running a Storj node on Windows.
🔍 What is Storj?
Storj is a decentralized cloud storage platform that allows users to rent out their unused disk space. In return, you earn STORJ tokens, which can be exchanged for other crypto or fiat. PC Storage Sharing is a great way to monetize spare storage while contributing to a distributed network.
✅ Prerequisites
For PC Storage Sharing, as a minimum you’ll need:
- A Windows PC that is powered on most of the time (ideally 24/7)
- A dedicated storage drive with at least 500GB free (I used a 1TB drive, which showed as 0.93TB — I allocated 0.84TB to Storj)
- A stable internet connection (upload bandwidth is important)
- Basic comfort with port forwarding and routers
- A static IP address or DDNS (Dynamic DNS) setup — optional but ideal
- A valid email address
🛠️ Step-by-Step Setup Guide (Windows)
1. Get Your Authentication Token
Visit the Storj Node Operator Sign-up page to register your email.
You’ll receive an auth token required to link your node to the network.
2. Download the Windows GUI Installer
Head to the official Storj GitHub Releases page and download the latest Windows GUI Installer (storagenode.msi). Run it and follow the install wizard.
3. Set Up Port Forwarding
Storj requires TCP Port 28967 to be open and forwarded to your PC on your local network.
- Log into your router’s admin page (typically
192.168.1.1or192.168.0.1) - Find the “Port Forwarding” section
- Create a new rule:
- Port: 28967
- Protocol: TCP
- Local IP: Your PC’s internal IP address (e.g., 192.168.1.5)
- Save and reboot if necessary
You can check if the port is open using YouGetSignal Port Checker.
4. Configure the Node
During setup, you’ll:
- Enter the auth token from earlier
- Specify the amount of storage to share (e.g., 0.84TB for a 1TB drive)
- Choose the storage path (ideally a dedicated drive)
- Set the port (default is 28967)
5. Complete Setup and Launch
Once everything is configured, your node should start. You can monitor it via:
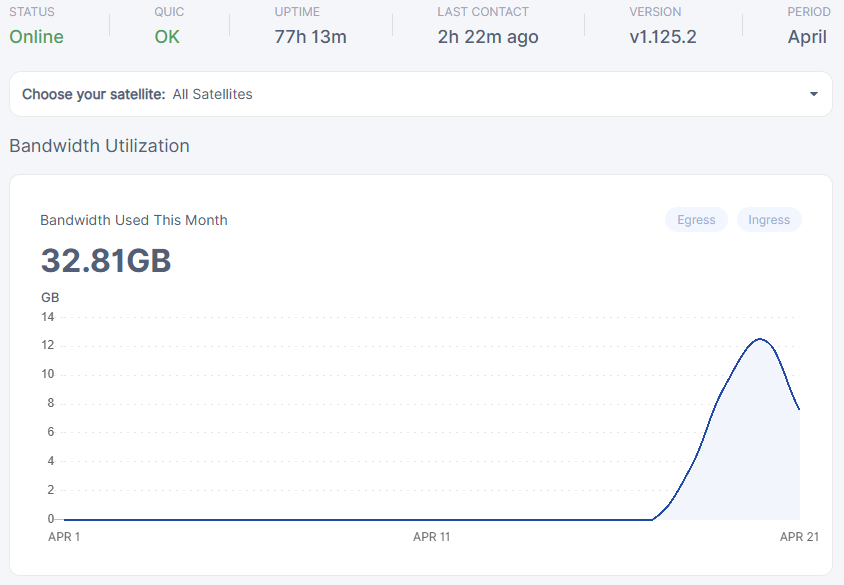
http://localhost:14002– Storj Node Dashboard- See real-time info on storage used, uptime score, egress/ingress bandwidth, etc.
Here is an example of what my dashboard shows after almost 3 days
📈 Real-World Insights
I’ve started my PC Storage Sharing journey with 0.84TB of an empty 1TB HDD allocated to Storj. It took a few days to get any meaningful data flow, and it’s still very early days at the moment, but once it began I was able to monitor:
- Uptime score stability
- Gradual increase in paid traffic traffic
- Monthly estimated payout in STORJ tokens
I’ll continue to share my real data soon — check back for updated earnings!
🔒 A Note on Security
Be sure your drive is stable and never disconnects unexpectedly. Storj penalizes node operators for downtime or missing files.
Consider using a UPS (Uninterruptible Power Supply) if power outages are common in your area.
🌟 Final Thoughts
Setting up Storj was easier than I expected. It does take a bit of technical setup — especially port forwarding — but once it’s running, it’s surprisingly hands-off. If you already have a PC running 24/7, this is one of the most “true passive” options available.
I’ll keep tracking the numbers for my PC Storage Sharing journey and updating this page with live data. For now, I’m cautiously optimistic about its long-term value!
📈 PC Storage Sharing – Real Data from My Storj Node
Loading…
Loading…
Loading…
Loading…
Loading…
Loading…
Loading…
Loading…